Showing posts with label Crafty. Show all posts

Saturday, December 31, 2011

The Crafts of 2011

Crafts of 2011
Or should I say 'the knits of 2011' since I really didn't do much else other than knit this year. Yes, I did a ton of sewing but it was all project bags for my shop. So they really don't count. I think I should make it a goal for next year to do more sewing that doesn't involve project bags. Yeah?

Anyhoo, when I first wrote down the list of projects and then made the collage I was kinda taken aback about having only 30 projects for the entire year. I mean, really? I had knit my ass off all year long and out of the 30 projects I only have 26 knitted items to show for the year?? But then I smacked myself. Knocked some sense into me. First off, I'm knitting. As all you knitters out there know (and you non-knitters should take note) that knitting is one of the most labour intensive crafts out there. Yes, you can fudge things left and right but really, unlike sewing, you are the one making the fabric. Knitting a sleeve could take hours of work, but in sewing those very same hours could get you an entire garment already...and then some! So really, I shouldn't be all hard on myself for only having 26 knitted FOs under my belt. Last year I only had 14 knitted items! I've almost doubled that amount in a year! I should be darn proud of myself!

I also need to remind myself that these 30 items are completed projects. Cause trust me, I have UFOs (unfinished objects) left and right all over the place! Throughout the year I had started a bunch of projects and either still have them on the needles or frogged them before they had a chance to even resemble anything. There's soooo many projects that I haven't even blogged about! Talk about secrets! Hmm...still on the needles...well, remember Phinney? I had started that pullover at the very beginning of the year. It was suppose to be my first project of 12 in 2011. Technically she's off the needles. All pieces have been knit, the only thing holding me back from completing her is the sewing up and then picking up the stitches for the collar. That's it. Really. What else is still OTN? A capelet, a pair of stripey knee-high socks (it was for a sock KAL with Hayley), 4 pairs of socks (a test knit, a stripey Skew similar to this pair, a variegated Skew like my first pair...can't you tell that I love Skews? Oooohhhh...maybe I should just frog the stripey knee-highs and turn them into knee-high Skews??? The wheels are turning...oh! I also have an ill-fitting-should-just-be-frogged-now pair of crap socks on the go too. Something tells me I should have a day where I do nothing but frog unloved projects that I didn't have the heart to deal with at the time).

Ok, where was I? Oh yeah, projects still OTN...let's see...well there Brett's cardigan (which is a shoulder, collar, and buttonbands away from being done), the Dahlia cardigan (I was obsessed about it back in September and October, started knitting it as part of a KAL with some ladies in my knitting group, and never blogged about the actual knitting of it), an Audrey in Unst cardigan (again, not blogged...like, at all), and remember this bad boy of a yarn cake?

Yarn Cakes
The blue one next to the normal sized cake? Yeah, that's currently being turned into a shawl slash wrap. Again, I haven't blogged about this project but I'm not even close to being even halfway finished and looks like a blob of blue. Doesn't make for pretty blog photos, that's for sure.

Then there's the projects that just need some finishings...like the jacket for the Munchkin (it just needs the icord closures) that I haven't had the heart to finish since he won't even wear the Thorpe I had knit for him, and another hat for the Munchkin (which again, I don't have the heart to finish...see previous item's reason for not finishing). My Hooray Cardigan should really be added to the FO list but it's still awaiting for some grosgrain ribbon to be sewn onto the button bands...and oh, some buttons too. We won't even talk about the projects I had knit in 2010 that just needs some simple sewing done to them that I thought I would do at the beginning of this year.

I've been trying to give myself pep talks about clearing out the proverbial knitting basket and clearing the knitting WIP clutter. I think it's starting to work cause I'm slowly getting antsy about turning those WIPs into FOs and reclaiming all my needle tips and cables back. Who knows, maybe I'll finally have a full set of interchangeable needles again? Wouldn't that be something?

I have a lot of plans and ideas for 2012. So much so that January is already looking to be a tightly scheduled month. I think I better go get a new day planner and start penciling in my plans and hope that my schedule is do-able. I hope someone somewhere will discover a way to add a few more hours to the day in 2012. Or am I the only person who's stupid crazy enough to put themselves on an intense crafting agenda?

Monday, November 14, 2011

Double Overtime

Double Overtime
Remember when I knit this project for Brett? The one that made me touch yucky Red Heart Super Saver yarn? Yeah...that's right, the wrestling mask that I started knitting with gusto until the feel of the plastic-y acrylic slowly made me dry heave and made my hands sweat after a few minutes of knitting (I mean, there's acrylic and then there's Red Heart...'nuff said). The mask that I had to force myself to work on cause the intarsia was really starting to put me off on the entire project. The mask that I eventually stopped working on in favour of more exciting projects that involved nicer yarn, which then made Brett go crazy with anticipation to the point where he'd leave the mess of scratchy yarn on top of the computer keyboard, on top of my other WIPs, on top of my mobile (which he would then call, in hopes that I would touch the dreaded mask of crap)...if it was something that I used on a regular basis, Brett would have the unfinished mask lying on top of it - all as "gentle" reminders that I needed to finish the blasted thing so that he could sport it.

I finally decided to just bite the bullet and get 'er done. So I did. Mainly so that I wouldn't have to touch that knitting blasphemy ever again...and to get Brett off my back. But moreso the former. I was so beyond happy when the mask was finally and handed over to Brett. He wore it a few times and then tucked it away in his sock drawer. After a while (when hockey season was over) we both had completely forgotten all about that mask.

Then sometime over the summer I got an email from an author who claimed he was writing a book about hockey and fan culture. He found my photos of Brett wearing the mask and his Calgary Flames jersey, which lead to my blog, which lead to the email. He wanted to know if he could use a photo for his book. A quick Google search to see if he was legit (and he was) and I messaged back that he had my permission. Then promptly forgot all about it.

In September I got another email, this time asking if I was willing to give permission again to have that photo used in a contest leading up to the book's release (edited to add: the book is called Double Overtime: The Hockey Fan's Ultimate Hockey Book by Stephen Cole), as well as other promotional material (edited to add that the website for the book is here). Brett was giddy with excitement (he thought this would prove to the world just how big of a Flames fan he was...and the idea that he would be on the same page as Jerome sent him over the top). I thought why not and told Stephen Cole that he had my permission.

Well, the book's release has been promoted over Facebook and anything that involves the sport of hockey. The other day as we were shopping we came upon the book. Excited, we flipped to the Calgary section and was startled by what we saw:

Double Overtime 2

When I was first asked about the photo, I thought it would be tucked into a collage of other photos and would be easy to miss. I honestly didn't think it would take up half of the page! Imagine just how big Brett's head got when he saw this! Instead of waiting for our copy to arrive in the post, Brett bought the book and has been showing it to anyone that has any remote interest in the sport (which is quite a lot of people...after all, this is Canada!). He also think it's pretty hilarious that out of all the projects I've ever knit, it's the one with the crappiest yarn that has garnered the most attention so far. I beg to differ. But that's a whole other post.

I thought I would share this, since Brett is so darn cute excited about this himself. I figured I had a right to be too. After all, my name is printed in the back in the credits!

Thursday, November 3, 2011

Auto Pilot

Auto Pilot Crafting>
Hey guys! Shhhh! I really shouldn't be blogging right now. But I thought I would pop in and say hello and tell you that my posts may be a bit sporadic for the next week or so...

Most of you may not know this, but on top of my intense knitting schedule I also have quite the full sewing schedule too. I think I may have bitten off way more than I can chew, and it's all starting to overwhelm and exhaust me. I'm crafting on auto pilot here! The scary part? The gift knitting hasn't even started yet. I have to thank my lucky stars that I don't have much to do for gift knitting...just the sweater for Brett and some small, quick-knit accessories. Phew!

The sewing, on the other hand...well...that's a different story. I've been trying to squeeze in as much sewing time as I possibly can in the non-existent extremely limited sewing time that I have. What's the deal, you ask? I'm trying to build up enough stock for my shop for the holidays. So what does that entail for me? Well, now that the Munchkin no longer takes naps (and this is so beyond sad for me) I stay up until 3am prepping (ironing and cutting fabrics) in between knitting rounds, then waking up early in the morning hoping that I can sew for at least half an hour before Brett has to go to work. Sometimes I can get a seam or two sewn while the Munchkin is off in his own little world but really, during the day I'm trying to keep on top of the housework, play time, and all the things that involve being a mom.

But I think I need to take a break. When you're trying to squeeze in this much crafting in such limited time, some things are bound to slip through the cracks. Small things, like remembering to sew in a pull-tab. Then realizing this little error when the bag is finished.

Missing Pull Tab

Crappers.

I'm not willing to stop and rip the whole bag apart just to add the tab. I need to keep going forward. What else can one do while crafting on auto pilot?

Oh, and what about forgetting to put away the much disliked so-called "medium weight" fusing, which you end up using in not just one, but two bags. I remembered while sewing the two bags that they felt much lighter and looked a little too flimsy for my liking but thought that I was just overly tired was imagining it all. Sewist's denial? Maybe. Then as I finished up the second bag the gut feeling that was eating away at me had its last chomp and that's when I realized that in fact I did use the wrong fusing. You can't tell by looking at it (it's the Harajuku Fun bag), but you can definitely feel the difference. There's absolutely nothing wrong with the construction of the bag. It just doesn't meet my standards.

So what should I do?

I'm thinking maybe I should open a sale section in my shop to sell the "as is" bags...the ones that don't meet my expectations. The ones that may have a pucker in a seam (yuck!), the ones that may be made with a weird colour/fabric combination (was I that tired when I pulled those fabrics together??), and the ones that may have a slight fabric flaw (how could I not see that weird line running through that print??). What do you guys think? Yay? Or nay? Über bad idea? Obviously these bags would be sold at a discount. I wouldn't want to pay full price, why would I expect anyone else to?

Well, while I ponder what to do with my less than perfect bags (after all, I can't keep them all to myself!), I'm going to do a quick giveaway! Since I made two Harajuku Fun bags with the lighter fusing, I'm going to give one of them away. Please note: the bag is in perfectly good, working condition with nothing visually wrong with it, it is in fact, below my shop standards. I don't want the winner to get the bag and be completely disappointed that the bag can't keep its boxy shape cause it's so smushy. If you think you can handle that and want a chance to win the bag, keep reading on!

Harajuku Fun Giveaway

** The giveaway is now closed!! Thank you to all who has entered and left comments!! **

Giveaway details:

The giveaway is open until Friday November 4, 2011 at 12 midnight PST (I told you this was going to be a quick one!). I'll use the random number generator to pick a winner (if anyone enters, that is!) and will be contacting the winner sometime over the weekend.

To enter, all you have to do is leave a comment telling me if having a sale section for the one-offs is a good idea or not and why.

Coolio? Ok. I should go throw some ingredients into the crock pot and get cracking on some knitting. Good luck!

Thursday, September 29, 2011

Finished: Ruffled Bib Necklace

Ruffled Bib Necklace
Remember this post? I mentioned that I was feeling crafty after being sparked by the necklace that Kat of Petticoats & Peplums had made and blogged about. I had this pattern in my Ravelry queue too and had always wanted to make it, but bypassed it in favour of patterns that I knew I could pull off. I'm always just too chicken to try my hand at crochet again and always feel so intimidated and inadequate by this craft. Well, I finally got off my butt and faced my fears. And I'm so glad that I did!

This project seriously took me a few hours to whip up, even after having to refresh myself on certain things (like triple crochet) by watching a few videos on youtube. I also got over the daunting task of weaving in the ends and having to to sew the piece together. It was definitely a just buckle up and do it scenario.

I'm quite proud of this project, but if truth be told I'm not sure just how much wear I'll get from it. I can't imagine wearing this while the Munchkin is around, not unless I plan and want the necklace to either be ruined or soiled...or both. I'm also quite surprised that I even had the stuff on hand to complete the project. I can't remember why I had the ball of cotton yarn in the stash, I think it was bought before I realized just how much I dislike working with cotton (due to the fact that it hurts my hands like a mofo, but crocheting with it isn't as bad as knitting with it). The findings were from back in the day when I thought I would try my hand at jewelry making (which never happened, so all the packages were still unopened!) and were stashed away in a random drawer on the desk.

The instructions on how to sew this together were a little on the vague side, and I perused the project pages on Ravelry to see how everyone else had sewn theirs (but no one left any notes/comments about that). I knew I wanted mine to be layered and a bit on the bigger side, so I just did what I thought looked good. One thing that's awesome about crochet fabric is that the sewing and weaving in of ends can really blend in well. My only issue with this piece is that it's not completely symmetrical. I'm all for asymmetrical things, but it needs to be drastic enough to look like it's suppose to be asymmetrical. When it's just slight it ends up looking sloppy. So one side is a bit more tiered looking and the other is rounded. This kinda bugs me. But I think it's the perfectionist in me talking. I think when I finally do get around to wearing this in public (most likely either on a date night or at another beer knit night) I'll just have to remind myself to not look in the mirror. Maybe that way I'll forget that the necklace isn't perfect.

Ruffled Bib Necklace 3

Necklace Details:
Pattern: Ruffled Crochet Bib Necklace by Stefanie Fail
Colour: Marshmallow
Hook: 4.0mm (US G)

Sunday, September 25, 2011

Craftin'

Pink Tools
Sometimes you see something and it sparks a creative fire within you and before you know it you're digging around your stashes and come up with exactly what you need. Did I say stashes with an 'es'? Oh hells yeah I did. I dug through my yarn stash, my crafts stash, and my miscellaneous stash (y'know, the stuff that really can't be categorize other than "stuff").

I worked on this project the entire time the Munchkin was down for his nap the the other day and didn't think I would get to finish it completely until yesterday when I rooted around my crafting supplies and found what I was going to go out and purchase. Then I realized that I needed tools. I took one quick look into Brett's man cave before quickly shut the door, I don't think he has any rhyme or reason for the way he organizes his things and I would be lost in his closet in an endless search for needle-nose pliers and wire cutters.

But wait! I was once a single gal that didn't need a man to help fix things around my apartment. Mind you, a lot of the things that needed fixing was remedied by my trusty hammer...and maybe an Allen key or two. But I did own tools.

So I was crafting. I'll be able to show you what I've done when I get around to taking some photos. That is, if I can find the battery charger to my camera. The thing about cleaning house - sometimes you just don't know where you've put things in your attempt to make the place tidy. But trust me, I was craftin'!

Thursday, September 15, 2011

The Last Melt

Crayon Canvas Melt - Munchkin
I promise...this is the last crayon melt that you'll see on this here blog. For now. I'm not going to say forever, cause who knows, maybe one day I'll have the urge to do it again for some different occasion. You never know.

Anyhoo, this one I did for the Munchkin's bedroom. We decided to keep the original rainbow version in the kitchen. I still wanted new art in the Munchkin's room though, so I decided to dig into the leftover crayons and use up all the colours that are the Munchkin's current bedroom colour schematics - which is blue and green, with dark chocolate brown wood accents.

Crayon Canvas Melt - Munchkin - Premelt

The purple was thrown in there solely because I didn't have that many blue and green crayons and the idea of leaving such white space around the crayons bothered me. I like how it turned out though, I think the dash of purple really adds depth to the entire piece.

Again, there's not much to say about this since I've already said what I needed to say in the first and second pieces. I did however, learn from the second and mixed up the air flow settings from high to low from time to time (always with the nozzle attachment on) to get more wax coverage and control over my medium. I hope to get a frame for this too, but for now a light coat of polyurethane will have to do to 'til then. Just hope that I don't change my mind and decide to switch up the art again before I have the chance to frame this!

Wednesday, September 14, 2011

Punky

Crayon Canvas Melt - Barbie
Over the weekend I did the prep for 2 more crayon canvas melts. Talk about obsessed, I know. In hindsight I really didn't have to think the leftover crayons were going to go to waste, after all, I do have a young child in the house and eventually those crayons would be used to make beautiful masterpieces that would adorn our fridge door. But I made more melted crayon art any ways.

This new one is for me. Can't you tell? I'm not sure if I'm going to put it in my sewing area or if it's going to be hung up in our bedroom. This time around I just experimented with the different settings on the hair dryer and tried to figure out if working with or without the nozzle attachment made any difference (it did). I wish I had more pink crayons in this, but really when it comes down to it I always think something could use a little more pink. Overall I'm really happy with how this turned out.

Crayon Canvas Melt - Barbie Closeup

Aside from experimenting with the heat and air levels, the only difference that I did from the first piece was to line up the crayons so that the wrappers were all aligned. It used to bug Brett that the wrappers didn't really line up on the first one (he got over it pretty quickly), so I made sure that this one did.

Since I used an artist panel instead of pre-stretched canvas, I sprayed a light coating of polyurethane over the entire piece. I would love to find a shadow box-type frame for this but it isn't high on the priority list...yet.

Saturday, September 10, 2011

Crayon Canvas Melt

Crayon Canvas Melt
Remember when I said I was feeling crafty? This is the result of that. I know, I know...it's totally not original. I had seen this on Pinterest a few weeks ago and was dying to make my own version.
Sorry for the cruddy photo, but the sun was starting to set and that had cast a slight orangey glow in the kitchen and I have yet to figure out my camera settings for stuff like that.

For some reason I already had a bunch of pre-stretched canvas in my sewing closet (I'm sure I had other plans for it...obviously that didn't pan out!) and right now is the perfect time to stock up on crayons, since everywhere you go there's a back to school sale on office supplies. So after a quick trip to Walmart for crayons and hot glue sticks, I was all set to start my li'l art project.

While the Munchkin was napping I arranged my crayons in a pleasing order on the canvas (so that I knew just how many crayons I would need). I ended up using 70 crayons for this piece. I had bought two 64-count boxes and one 24-count box cause I knew I would need to supplement and sub out certain colours that didn't work with my colour scheme...like the browns, black, and white. For those who want to know, I did have to use repeat colours to make the section more saturated with that colour, like yellow. I used 3 "Yellow" crayons with the rest of yellow hued crayons so that that section could pop out as much as the others.

Anyhoo, I set up shop on my kitchen table and with my trusty hot glue gun I glued all the crayons to the canvas. Unfortunately the Munchkin woke up and I had to wait until the next day to do the real fun of the whole project...melting the crayons!

With Brett behind me filming (cause that's Brett...always filming, just in case), and newspaper laid out on the floor, I fired up my hair dryer and got started on melting those sticks of colour. About five minutes into it I had to stop and tape up some paper towels to the wall cause the wax started to splatter everywhere! But I was getting results...

Wanna see? Brett made me this video so that I could put it on the blog. What a sweetie! Check it out:


I'm happy with the results, but not satisfied. I was hoping for more melt-age action (yup, I made up that word) and was hoping the drip marks would reach a lot further down the canvas. I'm also not crazy about the splatter marks. Brett likes them but I prefer a cleaner canvas. I think if I had taken the nozzle off the hair dryer I would have had better results, probably the one that I was looking for. I'll have an opportunity to test out this theory because I'm planning on making another one but this time in all blues and greens, and maybe a bit of yellow. I think the Munchkin's room needs a change in art work. I was also thinking of making one that was black, grey, white, and pink (surprise, surprise!). I'll have to check out my crayon situation, and really think about having so many of this kind of artwork in the house...

Brett thinks making another one is a great idea. He really loves this version, even more so now that he's hung it upside down. He thinks the piece looks like "an explosion of colour", so for now this piece is hanging in the kitchen above our table (where he can see it every morning).

Notes for next time, and for those of you who want to do this:

- this is definitely an outside project. Not unless you really cover everything. By the end of it, not only were my feet splattered, but the wall behind the canvas was completely speckled! Nothing that a Magic Eraser and some elbow grease couldn't take off.

- if you have a nozzle attachment for the hair dryer, don't use it. The nozzle directs the flow of hot air too forcefully onto the crayons and at such close range makes the wax splatter.

- don't use cheap crayons. The cheaper the crayons, the more waxy they are but less pigments are used. If you want nice, bold, and saturated colours definitely splurge a little and get the name brand stuff. Especially since the crayons are the focal point of this project.

- you don't have to use pre-stretched canvas that's already mounted and ready to hang. Just make sure that whatever surface you use that it's sturdy enough to handle the weight of the melted crayons.

Happy crafting!! ♥

Thursday, September 8, 2011

Feelin' Crafty

Crayon Art Prep
After a weekend of not doing anything remotely crafty, I suddenly have a million project ideas floating around in my head. I had a
major urge to do one of those projects immediately. So I did it. I just need to get a good photo of it before I can share it with you guys.

But right now I have pressing matters to deal with: a few more ideas stemming from this project that I just have to do. Now. So excuse me, I have a date with my hot glue gun...

Friday, August 12, 2011

Social Knitworking

Check it out: Victoria's Monday Magazine featured an article about knitting and knitting groups! I love it when non-knitting or fiber arts related publications have articles on knitting. I love it even more so when they talk about how cool knitting really is and try to break the "Grandma" stigma that's attached to knitting.

Know what else I love? Seeing random photos of people knitting. Especially celebrities. Cause it brings knitting to light how fabulous this craft really is. When I first found out that Kristen Stewart (of Bella/Twilight fame) knits and was photographed knitting on sets, I had to giggle with glee. Yes, we all know that Julia Roberts knits and has encouraged co-stars to knit. But did you know that Kristen Davis (Charlotte on SATC), David Arquette (he's on the cover of Celebrity Scarves 2), and apparently Russell Crowe all knit?? Yeah...bad ass.

Mary (our "Queen Bee" as I like to call her) was interviewed for this article (she's the one in the photo with me), and even though I'm in the photo, I wasn't interviewed. I was just there to look pretty. HA! I'm just glad that I wasn't referred to as a "Yarn Hussy" (thanks Jennifer!). Anyhoo, if you're in the Victoria area snag yourself a copy of Monday Magazine (it's free!). If not check out the article here and let me know what you think about the new popularity in knitting.

Sunday, June 12, 2011

WWKIP 2011

Knitting in Public
I totally dropped the ball on this one, but yesterday was the start of the week-long World Wide Knit in Public event. Yesterday was also when Victoria knitters decided to do their Knit in Public Day. I couldn't go due to the fact that I have a toddler that can't sit still long enough when outside for me to get a few stitches in, let alone a few minutes of knitting done. Oh well, I'm not sad about it cause I'm always knitting in public anyways. Seriously. If I'm in a line up at the grocery store, I'll whip my knitting out. If I'm at the doctors/dentist/anywhere that involves a waiting room, I'll pass the time knitting. If I meet up with a friend for coffee, I'll be knitting while sippin' and chattin' (with permission, of course. Some people might feel like my knitting will mean I'm not paying attention to what they're saying). If the Munchkin falls asleep in the stroller while out and about, yeah I'll take a moment to sit on a bench for a few minutes to knit a few rows.

But to honour WWKIP I decided to take a moment earlier this afternoon to go to the park (which was completely deserted), enjoy some rays while knitting on a quite bench for an hour. It was quite a lovely time. I can't remember the last time I had such a quiet and peaceful moment. I'm thinking I need to do this more often!

So who else is partaking in WWKIP?

Wednesday, November 10, 2010

Heart Houndstooth

Houndstooth bag tumbler

Two years ago I made my first post about my love of houndstooth. Fast forward to today and I'm still, if not even more so, in love with houndstooth. And I'm still in search of houndstooth fabric in 100% good quality wool in oversized scales. In the meantime I've been curbing my houndstooth appetite with small projects, such as the project bag and travel tumbler shown in the photo above.

I have quite the stash of Paula Prass' Summer Soiree fabric in 3 of her colourways, but have always been a little hesitant on actually using it (lest I run out!!). I finally broke down and decided to make a project bag since: a) it uses a small amount of fabric; and b) I needed a project bag for a cardigan that I'm currently knitting up. Of course, I also had to line my bag in pink, after all, I am using my favourite print of all time!

The travel tumbler is of the design-it-yourself variety, purchased last year with plans of being turned into a Christmas present for a grandparent. Obviously that didn't happen. So instead of letting it continue collecting dust in the cupboard I rummaged around my sewing closet and discovered the leftover paper from my Knit Kit. The paper was just big enough for me to draw the tumbler template on! This is my new fave travel cup to take with me to work and Toddler Time.

I'm thinking of getting the Noro off my loom and try my hand at weaving my own houndstooth. While digging through my closet last week I came upon this once-was-a-favourite capelet and thought how even more wonderful it would be if it were in a jumbo houndstooth print.

Houndstooth Cape

After a thorough inspection I think the capelet would be pretty easy to draft and simple to sew up. I wouldn't bank on seeing a new houndstooth capelet on this blog any time soon though, I would need to experiment with the weaving and try to find the right scale that I have in mind. Then I would have to weave up each pattern piece...yeah...this project idea will definitely take awhile!

Hmm...I wonder how else I can get my houndstooth fix?

Friday, May 28, 2010

Guess What I'm Doing?

Tonight I'm skipping the usual Friday night Knit Night with the Bees and heading over to Knotty By Nature to take a class. I've been thinking and wanting to do this for some time now, but wasn't sure if I wanted to potentially add another hobby to my ever-growing list of hobbies. Not to mention that my house just doesn't have the room for me to have a new obsession hobby! But who knows, maybe I won't like this activity at all?

I'd go into more detail, but the Munchkin is getting antsy and wants to go outside. So stay tuned...the next post will be all about my new adventure!

Tuesday, May 18, 2010

A Different Point of View

Brett secretly drew this (ok, it wasn't a secret. He was sitting a few feet away from me when he did this but I was so wrapped up in my own little world of flower making to even notice what he was up to) the other night. He claims that if anyone were to look at me through his eyes, this is what they would see: a crazy woman obsessed with making yarn flowers while drinking So Nice Caramel Macchiato Soy Beverage. I have to admit that when he showed me the sketch I laughed pretty darn hard. Aside from the helmet, the drawing is pretty dead on.

I really have been drinking way too much of the oh so yummy soy bevvy, and I really have been making way too many flowers.

I need help.

Sunday, May 16, 2010

May Flowers

In my last post I mentioned that I was inspired. What was I inspired to do? I was inspired to make tons and tons of flowers made from yarn! Why? Because early last month the Spring Knit Picks catalog arrived in my mail box:

Which compelled me to dig up my vintage flower looms, grab my stash of left over yarn, and start making flowers galore! I have no idea why I had flower looms amongst my crafting tools (obviously to make flowers with, but why did I need to make flowers??), but I did. I think I bought them a few years ago, probably made a few flowers out of raffia and that weird plastic twine stuff that you can get anywhere in Chinatown, and from there they just sat in a box of full of miscellaneous crafting items. Until now.

The past week I've been a woman obsessed. All I wanted to do was make flowers. And all other crafting endeavors were put on hold. Several times Brett laughed at me and commented quite often how every time he looked over I would be surrounded by little balls of yarn with bright, little flowers every where. I think he's getting a bit sick with this current weird obsession of mine. Especially the part where I shove a freshly off the loom flower in his face and demand that he look at it and coo about how cute and pretty it is. Actually, I know he's sick of that part cause the last few times I showed him a new flower he would barely shift his eyes to even pretend that he looked at it before muttering "mmm hmmm".

Anyways, one of my looms is an old school square Bucilla loom from the 70s. I've rarely, if ever, used it and now I know why. I think it produces a pretty ugmo flower that looks like a mistake. Like it was suppose to be circular but the crafter was being sloppy in how they were winding the yarn.

Sorry for the crappy photo! My camera couldn't pick up the correct color without washing it out

I'm getting pretty fast at making these bad boys. I haven't officially timed myself, but I think it's taking me about 10 minutes to churn one of these out. After producing my 30th (I think?) flower and forcing Brett to look at it, he laughed and asked me what I was going to do with all these flowers.

Oh. I haven't gotten that far yet. I have no idea what I'm going to do with them. Any one have any ideas?

PS: You can check out more of my yarn-y flower goodness here.

Wednesday, May 12, 2010

Saturday, February 6, 2010

I want candy!!

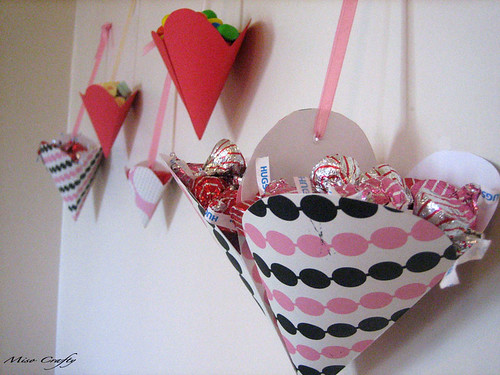
I'm not a huge Valentine's Day fan, but I'll use any excuse to be able to decorate the house in pink that I can and not get any slack for it! So since V-day is right around the corner I thought I would make a few V-day related crafts to put around the house. Starting with these bad boys (see above, sorry...the lighting was crap the day I took these photos!). I saw these whilst perusing the Martha Stewart website trying to find cookie recipes. What are they? They're bonbon-filled hearts! Ok, so mine aren't filled with bonbons. I opted to fill mine up with the must-have cinnamon heart candies and large conversation hearts, as well as seasonally wrapped Hershey Hugs and Kisses, jelly beans (in pinks, reds, and white of course!), and just for Brett - peanut M&Ms!

These darling little hearts are super easy to make and are truly easy on the wallet, which is great if you don't want to spend a lot of moola (or any) on decorations for such a day as Valentine's. I used leftover card stock from Christmas and scrapbooking card stock, that for some weird reason I had laying around in my sewing closet. The ribbons were from my stash and all I needed to purchase was the candy. Brett and I are both chocolate lovers and so V-day related sweets were bound to cross our threshold, so I figured why not have a cute way of holding our edible goods (not to mention easy access!) instead of having the stockpile scattered all over the computer desk?

You can find the directions to make your own here. But I must warn you, some steps really aren't clear. Like in step 7: Slide fold A behind fold B. The diagram shows absolutely nothing. So take note that what Martha wants you to do is to align the folded parts that's in the middle together so that they are one and you end up with 2 compartments. Another useful tip: the so-called heart template on the website is a useless thumbnail photo, so what I did was trace the outline of my folded up square (so you know how big your template needs to be) on another piece of paper, cut it out, fold the template paper diagonally so that you have a triangle shape, and draw your own heart. Cut that out and voilà! You've got yourself a template without having to waste a million sheets of paper trying to get Martha's version to match your square.

I like these so much that I'm thinking of getting some pastel colored card stock and making a few for Easter. I'm not sure if I'd cut out a heart shape, maybe turn them into cones and then embellishing them to jazz them up a bit. The beauty of this project is that you can make the holders as big or as small as you want. I can already picture mine holding Cadbury mini eggs, foil-wrapped egg shaped chocolates...and big ones with shredded green paper to cradle decorated eggs...ooohhh...the possibilities!

LinkWithin

Related Posts Plugin for WordPress, Blogger...