
For some reason I already had a bunch of pre-stretched canvas in my sewing closet (I'm sure I had other plans for it...obviously that didn't pan out!) and right now is the perfect time to stock up on crayons, since everywhere you go there's a back to school sale on office supplies. So after a quick trip to Walmart for crayons and hot glue sticks, I was all set to start my li'l art project.
While the Munchkin was napping I arranged my crayons in a pleasing order on the canvas (so that I knew just how many crayons I would need). I ended up using 70 crayons for this piece. I had bought two 64-count boxes and one 24-count box cause I knew I would need to supplement and sub out certain colours that didn't work with my colour scheme...like the browns, black, and white. For those who want to know, I did have to use repeat colours to make the section more saturated with that colour, like yellow. I used 3 "Yellow" crayons with the rest of yellow hued crayons so that that section could pop out as much as the others.
Anyhoo, I set up shop on my kitchen table and with my trusty hot glue gun I glued all the crayons to the canvas. Unfortunately the Munchkin woke up and I had to wait until the next day to do the real fun of the whole project...melting the crayons!
With Brett behind me filming (cause that's Brett...always filming, just in case), and newspaper laid out on the floor, I fired up my hair dryer and got started on melting those sticks of colour. About five minutes into it I had to stop and tape up some paper towels to the wall cause the wax started to splatter everywhere! But I was getting results...
Wanna see? Brett made me this video so that I could put it on the blog. What a sweetie! Check it out:
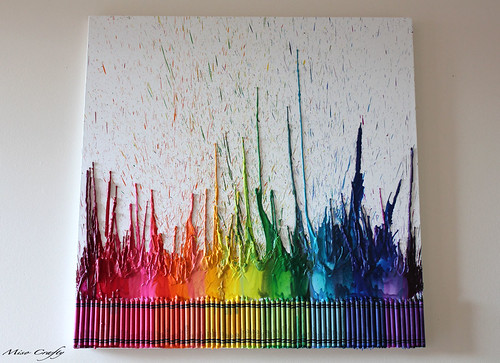
I'm happy with the results, but not satisfied. I was hoping for more melt-age action (yup, I made up that word) and was hoping the drip marks would reach a lot further down the canvas. I'm also not crazy about the splatter marks. Brett likes them but I prefer a cleaner canvas. I think if I had taken the nozzle off the hair dryer I would have had better results, probably the one that I was looking for. I'll have an opportunity to test out this theory because I'm planning on making another one but this time in all blues and greens, and maybe a bit of yellow. I think the Munchkin's room needs a change in art work. I was also thinking of making one that was black, grey, white, and pink (surprise, surprise!). I'll have to check out my crayon situation, and really think about having so many of this kind of artwork in the house...
Brett thinks making another one is a great idea. He really loves this version, even more so now that he's hung it upside down. He thinks the piece looks like "an explosion of colour", so for now this piece is hanging in the kitchen above our table (where he can see it every morning).
Notes for next time, and for those of you who want to do this:
- this is definitely an outside project. Not unless you really cover everything. By the end of it, not only were my feet splattered, but the wall behind the canvas was completely speckled! Nothing that a Magic Eraser and some elbow grease couldn't take off.
- if you have a nozzle attachment for the hair dryer, don't use it. The nozzle directs the flow of hot air too forcefully onto the crayons and at such close range makes the wax splatter.
- don't use cheap crayons. The cheaper the crayons, the more waxy they are but less pigments are used. If you want nice, bold, and saturated colours definitely splurge a little and get the name brand stuff. Especially since the crayons are the focal point of this project.
- you don't have to use pre-stretched canvas that's already mounted and ready to hang. Just make sure that whatever surface you use that it's sturdy enough to handle the weight of the melted crayons.
Happy crafting!! ♥
oh wow! I'll definitely be making one of these one day. and I like it hung 'upside down' too. I'd love to see the other colour schemes if you do them! x
ReplyDeleteYou are both completely nuts and completely awesome! What an awesome piece of art!
ReplyDeleteThis is so cool! I have seen a couple of these floating around the web and I would love to make one. I agree with Brett. I love how it looks upside down! And I like the splatters too. Nice work!
ReplyDeleteI LOVE this! I think I might have to make myself one too :-)
ReplyDeleteThanks for a great idea and to your Brett for a fab video!
That is seriously cool, with an awesome video to match!
ReplyDeleteThis is very cool, I love the fun colors and the look of the melted crayon!
ReplyDeletethat is awesome! i love it. it would look spectacular in my kiddo's room! thanks for the inspiration!
ReplyDeleteI LOVE IT!!!! This is now on my list of things to do.
ReplyDeleteWhat a rad and high quality video!
ReplyDeleteFor more melt and less splatter, try heating the crayons from behind the canvas. I've never done it, but I just read that on another site. LOL
ReplyDelete