
 I received a few emails about the scarf I made for my 2nd blogiversary giveaway. I was asked what yarns and yardage I used, the dimensions, and how did I do the fringe. So I decided to just write up a post about it. Hopefully this will answer any questions that anyone else may have.
The inspiration for this scarf came from the main yarn that I used, which is Diamond Yarn Luxury Collection in Edo, which I had purchased at the Beehive Wool Shop sometime at the beginning of the year with the sole purpose of being used for a weaving project. I had originally wanted the "Miso" colorway which was a gorgeous and vibrant Kelly green, but alas, they only had 1 ball in stock. So I settled on the "Kabuki" colorway that features pink and blue intertwined with chocolate brown or a steel grey. My camera really couldn't pick up the colors that well and the only photo I got that did was a pre-woven one shown here:
 I used almost an entire ball of the Edo in the warp, along with some leftover Cascade 220 in a medium charcoal shade and to bring out the blue I decided to use some leftover Patons Classic Wool in Too Teal. The Edo yarn is a mix of wool, microfiber, and alpaca and both the Cascade and Classic Wool is straight up wool. If I was given the chance to re-do this scarf, I don't think I would use the Edo in the warp. Although it's a plied yarn, it seriously acts like a single and just kept stretching and stretching while trying to adjust the tension. If it weren't for the Cascade and Classic Wool being so stable, I think the weave would have been loose and very sloppy. I'm actually quite surprised that my edges were even considering that my tension on the selvage ends were really loose.
 I'll admit that I don't really do any math when it comes to measuring out the length of my weaving projects. The only math involved is making sure I have at least 400 meters of yarn as my guideline (based off of previous projects) is 200 meters for the warp and 200 meters for the weft. Not super reliable, but it works for me. To get the length that I want, I take a scarf that I like the length of and lay it on the floor between the counter and the loom. Yes, I like to avoid math whenever possible. This is why I could never be a knitting pattern designer.
To figure out the width, I go with how wide I want the piece to be, figure out how I want the fringe to look and how many ends I want per fringe bunch, and then do the little math it takes to find out how many ends in total that would be. Since it's easier to do things in even numbers in weaving, I usually round off to the nearest even number. This is most likely the most wrong way of doing this, but like I said before, it works for me! So for this project I did a total of 100 ends.
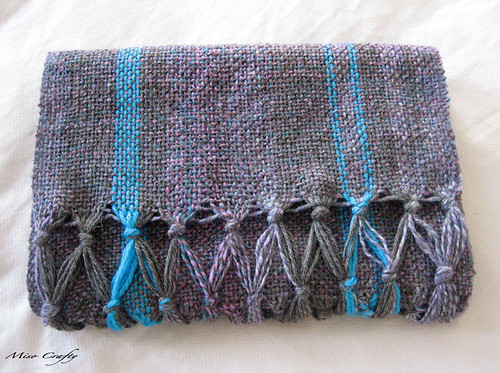
 The scarf came out 71.5" long (not including the fringe) and 11.5" wide. Wanna know a secret? I never know how long the fringe is going to be until after I tie up the ends. Once tied up I look at the scarf overall and make the fringe length to whatever is aesthetically pleasing. I'm sure a lot of real weavers out there are gasping in horror over my weaving "methods".
Anyways, I started to do a regular knotted fringe but halfway into the first end I decided against it. I wanted to try something different and not so boring looking. So I tried out the double knotted fringe and really liked how it turned out. I have a feeling I'll be tying up all my fringe like this for the next while! Again, I highly doubt I did this the "right way". To make the double knotted fringe I first laid out the scarf on the table, weighed down the end to be worked on with a couple of my pattern drafting weights, and tied up the initial row of fringe. I then combed out the strands with my fingers to space them out a bit in their section and to make them lie straight. I put one of the loom's shuttle sticks on top and right up the first row of knots and then divided each section in half, except for the ends, and proceeded to knot them up for the second row. I took a quilting ruler and my trusty rotary cutter and cut the fringe to the desired length. Voilà!

I seriously considered keeping this for myself but managed to convinced myself not to, since I had started this project with the blogiversary giveaway in mind. I did promise myself that I would weave another scarf to make up for this one.
So there you go. A long post about a simple scarf! I really hope that the winner, Kat will like it when it reaches her!
'Til next time, happy crafting!!
So there you go. A long post about a simple scarf! I really hope that the winner, Kat will like it when it reaches her!
'Til next time, happy crafting!!
No comments:
Post a Comment