
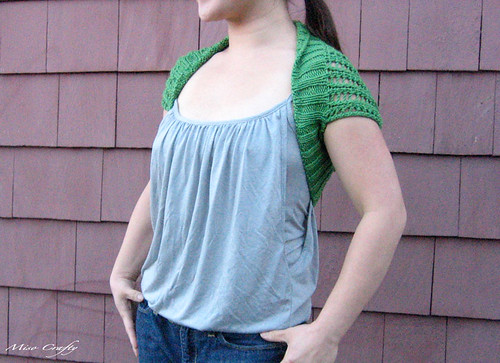
 This was my first FO for the Ravelympics. I'm not really a shrug or bolero wearing type person, but when I had spied this pattern ages ago I felt completely compelled to make it. I'm quite self-conscious about myself whenever I wear tank tops, I always feel too...bare, so I think this little number will help me feel a little more covered up. It will be perfect for spring and summer and will definitely add a little splash of color to my wardrobe. I've always played it on the safe side when it came to my knitting - using nothing but yarns in the black/grey palette, so this time I thought I would be daring and try some color. I couldn't really capture just how vibrant this green is, but trust me when I say it's green. So very green.
 I started this bolero on the night of the opening ceremony, after knitting a few rows of my socks. I couldn't really concentrate on the tiny yarn and stitches of the sock and watch the ceremony at the same time so I thought I would work on something that didn't require too much attention. I was bad and didn't do a gauge swatch, figuring that I would just measure my gauge once I got the ribbing going. Lucky for me it all worked out. I've never worked with such glossy cotton yarn before and was getting a little frustrated that the yarn kept sticking to my needles (I was using my Knit Picks interchangeables in the Harmony Wood) and halfway through the first row had to hunt down my Hiya Hiyas, which solved the problem.
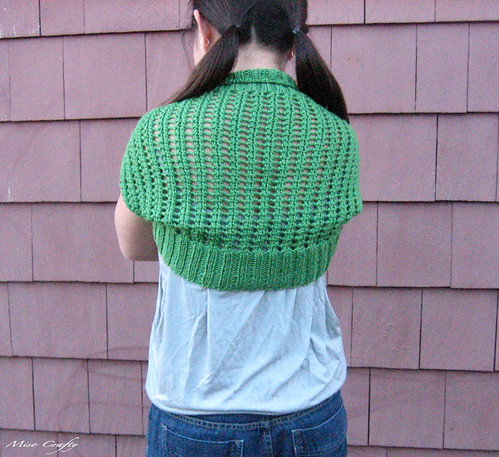 This pattern is super easy and knits up pretty darn fast. That is, if you make sure to keep track of the yarn overs and just how many of them you are purling. At one point I had dropped a yo and didn't realize it until I was a few rows past (I was watching hockey when it happened!). It took me about an hour to try to fix it without ripping out what I had already knitted up. I stuck a stitch marker on the messed up spot so that I could thoroughly inspect it later and make sure it blended in with the rest of the lace pattern. I can't even tell where the dropped stitch happened...phew!
One night I was so into knitting this that I didn't realize that I had stayed up 'til 4am! Brett had put the Munchkin to bed and ended up falling asleep with him, and I didn't notice until I looked up (finally!) and noticed that he hadn't come downstairs yet. Since I was dividing my time between this and 2 other projects, I was trying to find any spare second to knit a few stitches here and there...like in the line up at the grocery store, in my Doctor's waiting room, in the truck while Brett filled up the gas tank... The best part of this pattern is that there is very little sewing needed - just the seams that closes up the armholes. I was a little intimidated when I first started this project, I think it was the lace pattern that made me nervous since I've never done a stitch pattern that looks this complicated. Little did I know just how easy it really was. And very wallet friendly too! I used 3 skeins of Knit Picks Shine Worsted and had finished the bolero completely with a metre or two of yarn left over, so in total this project had cost me a little under $10 to make! I have some more Shine Worsted in my stash with no idea what to make from it, so another bolero might be in my future. But I'm not sure if I'm too inclined to repeat this project again, especially when I've got so many other projects that I want to do. I guess we'll see just how much use I get out of this bolero before casting on for another.
 Anyways, so here's the project deets:
Pattern: Ribbed Lace Bolero by Kelly Maher
Yarn: Knit Picks Shine Worsted
Color: 3 skeins in Grass
this is gorgeous! I tried to make this a little while ago but I could not get a hang of the lace pattern so I just ditched it and went to something easier. Yours looks awesome!
ReplyDeleteI didn't even know what bolero was till this blog post. the more you know right....
ReplyDeleteKat:
ReplyDeleteThanks! I had to watch a video on youtube about the purling into the double yo's when I started the project. My little trick the entire time was to hold onto the second yo while I purled into the first. It took me a row to get the hang of it, and a few more rows after that to really get into a groove. You should try it again when you have the chance, it really is super easy!
Jeremy:
Hahaha...after reading your blog I thought about a spray of stars shooting across the air above you!