

My very first (and very belated, I might add!!) tutorial!! This one is long over due, that's for sure! I had every intention of writing up this tute, but completely forgot cause, well...life happens, especially when you've got a baby! But after many comments and emails (and some of those emails weren't really nice...some were downright demanding and mean about it!), I decided to pick up where I had left off. I would like to apologize to those that have been waiting very patiently for this!
Oh, and sorry for the quality of some photos...the day I did this the weather was all over the map so the lighting changed quite a bit! Ok, so here we go!!
****Please feel free to make these carriers for your own use or for gift-giving, but please do not use these instructions to make carriers to sell or print any part of this tutorial to sell. Thank you!****
The ingredients:
- 1.5 meters (or 1 3/4 yards) of fabric
- Matching thread
- 35cm (or 14 1/2") long piece of 1/2" wide elastic
Also, a note about the elastic, you can use whatever width you want or whatever you have in your sewing room. I recommend the 1/2" wide solely for the comfort factor for the child. Using elastic thread is not recommended as it's not strong enough and I've found that 1/4" wide elastic can dig into the child's neck or back.
Ok, now for the deets on how to make your own carrier:
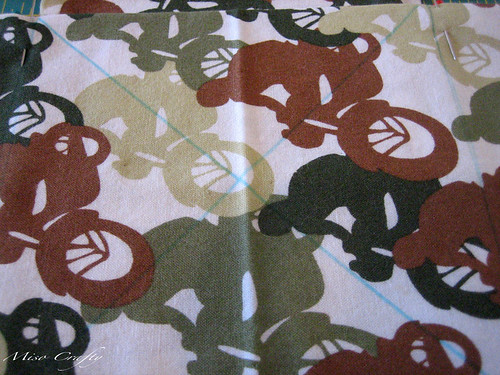
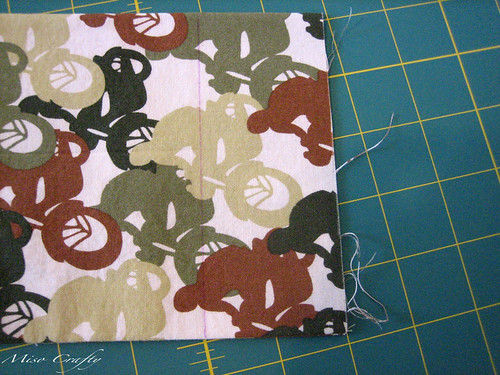
1. Lay out your fabric. To get the most out of the fabric, I unfolded the fabric, then folded one of the selvage edges towards the middle - enough so that I can get 2 strips of fabric cut from it like this:
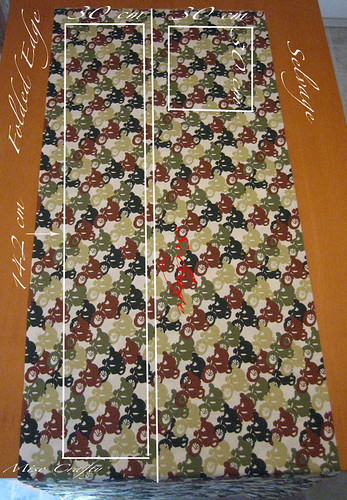 You'll want to cut 2 long strips that are 30cm x 142cm (11 3/4" x 56"), and 1 square piece that is 30cm x 30 cm (11 3/4" x 11 3/4").
You can make the carrier any size, I'm 5' and a bit tall and this fits perfectly. My cousin is 5'7" and she used these measurements too and it fit her perfectly as well. To get the size you want, I suggest draping a length of fabric around your body sling-style and then measuring from there. Just make sure you leave an extra 5cm (2") at the ends for seam allowance.
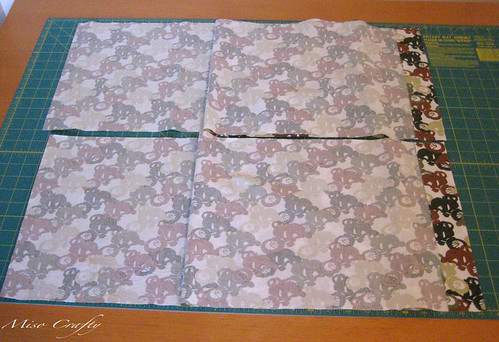
2. On one strip of fabric, fold one end down 5cm (2"), wrong sides facing. Press. Repeat with the other strip.

You should have, on each strip, one end folded, the other end the raw cut. Like this:
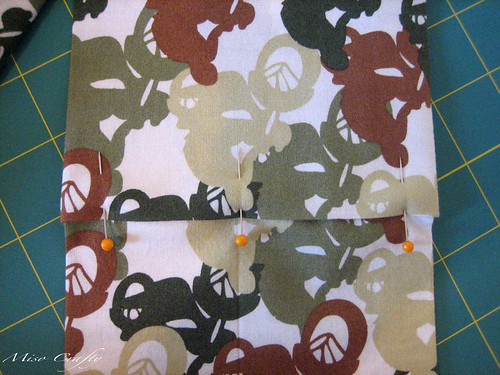
3. On each strip unfold the end and then fold and pin the fabric lengthwise with right sides facing.
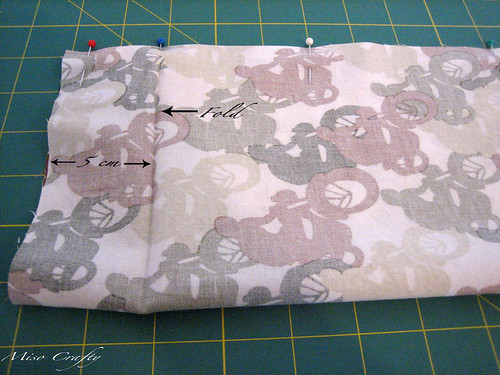
Your pinned strips should look like this:
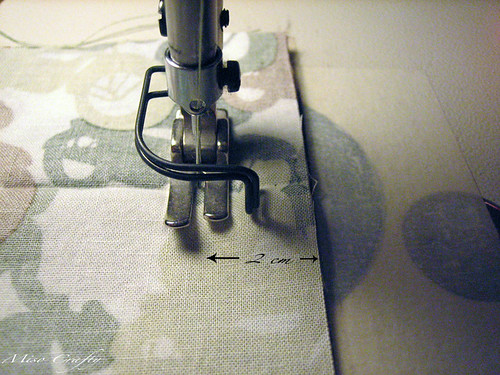
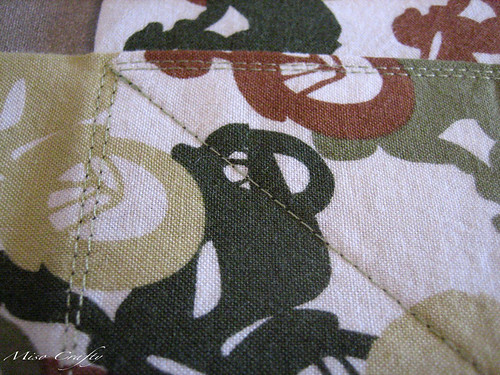
4. Now it's time to sew up these bad boys! Sew the lengths using a 2cm (3/4") seam allowance.
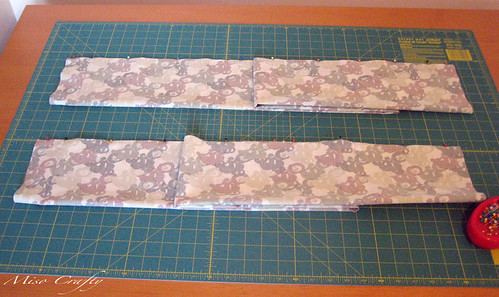
5. Turn each strip right side out and press, being careful with the creased end that was previously folded. Then re-fold that end and press again, making sure it is still measuring 5cm (2").
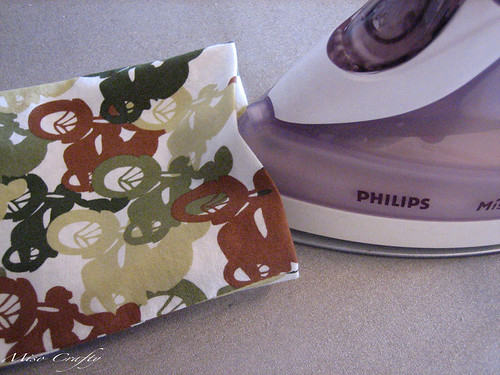
To make sure I'm being clear, each strip should have ends that look like this:

6. Now fold each strip in half lengthwise to find the middle. Either use pins or a fabric marker and mark the middle.

Measure the width of your strip and measure half of that on each side of the marked middle.
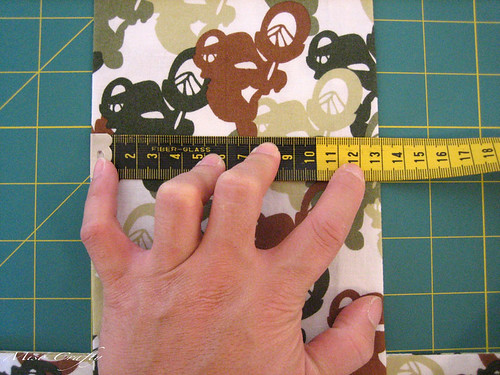
Again, using either pins or a fabric marker to mark the halves.
You should be forming little "boxes" with your pins or fabric marker, like this:
 Repeat with the other strip.
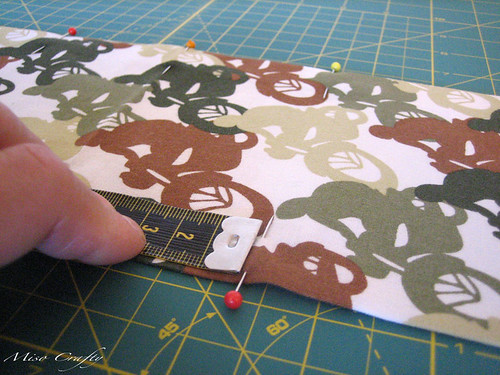
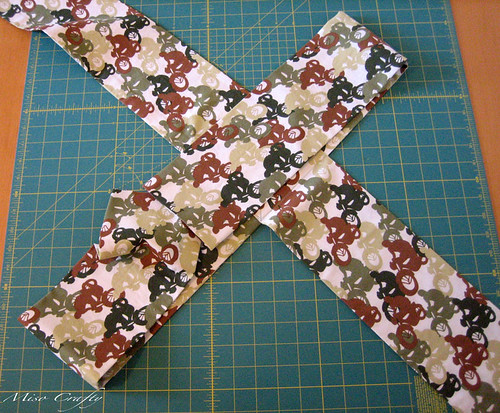
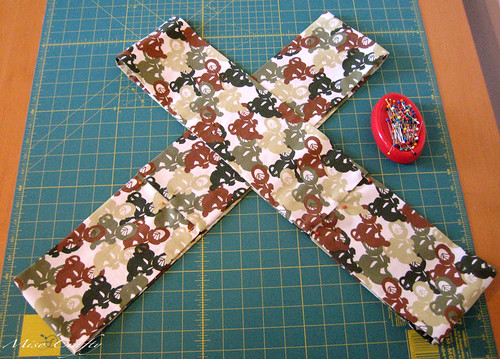
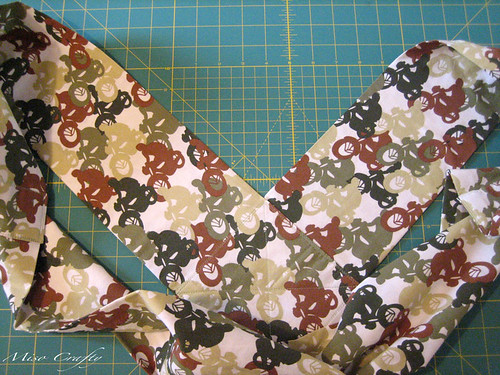
7. Lay one strip on top of the other, matching "boxes" to form a cross. If you are using a patterned fabric, make sure the pattern on both strips are going the correct way (imagine wearing the carrier and how the pattern would be)! Make sure you have both folded ends on one side. If you look at the photo below, the top and the left part of the strips are the straps that will be on my shoulders.

To make life a bit easier, before sewing I used a fabric marker and I drew the "x" pattern and the edges of the strip on the bottom so that I had something to follow when sewing the 2 strips together.
My method for sewing the strips together is to sew a square around the edges of the joined strips, then another square 1/8" away on the the inside of the first for extra security. Then I sew the "x" inside the square.
8. With right side facing down, place the carrier so that it looks like an "x". Bring the opposite straps together so that one folded end meets a raw edge end.
Tuck 5cm (2") of the raw edge end into the folded end.
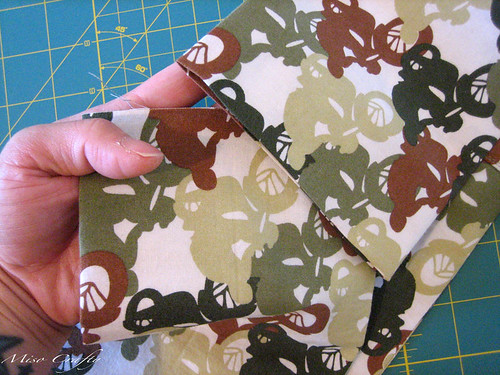
To make life easier (again!), measure 5cm (2") on the raw edge end so that you know just how far to tuck in the strap.
Pin through all layers. Repeat with other side.
You carrier should now look like this:
9. Sew through all layers on both straps. You can either just sew where the 2 straps meet, or if you're paranoid (like I am) about the straps somehow coming apart, you can sew all around the area where the 2 straps meet, like this:
 Or if you're lucky enough to own a sewing machine that does embroidery, you can embroider a funky line across the layers.
If you have a toddler or a kidlet that doesn't need extra back/neck support, you can definitely stop here and enjoy the carrier now! I took a few photos of what the toddler version looks like in action.
But if you have a younger child or a baby that needs that support, continue on...
10. With right side facing, fold square to form a triangle. Pin and mark a 5cm (2") opening. Using a 1cm (3/8") seam allowance, sew all around except for the opening.
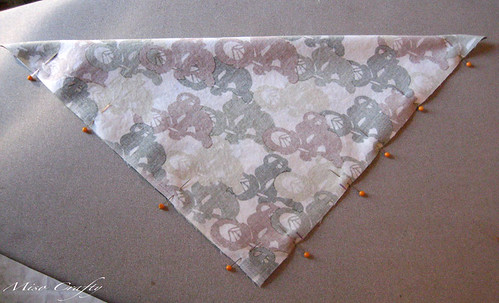
Turn right side out and press, tucking in the seams at the opening. You can handsew the opening close if you want, I usually leave it and it gets sewn closed when I topstitch and edgestitch the piece to the carrier.

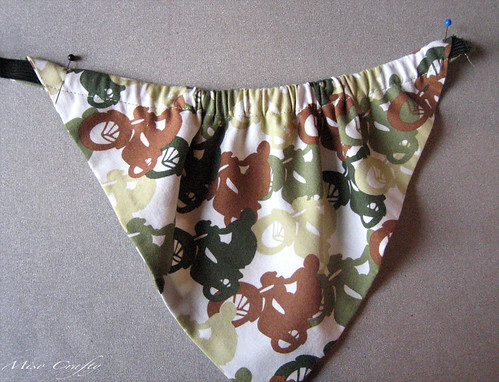
11. With wrong side facing, fold down the top wide edge 1.5cm (5/8"). Press, pin, and edgestitch close to the folded edge. This is forming the elastic casing, so leave the sides open.

12. Thread the elastic through the casing and pin one opening through all layers to anchor the elastic, and then pull enough of it out to make the piece as gathered as you want. Mine is 27cm (10 1/2") wide, in case you need an idea as to how big/small to make this piece. Baste the elastic at openings and trim off excess.
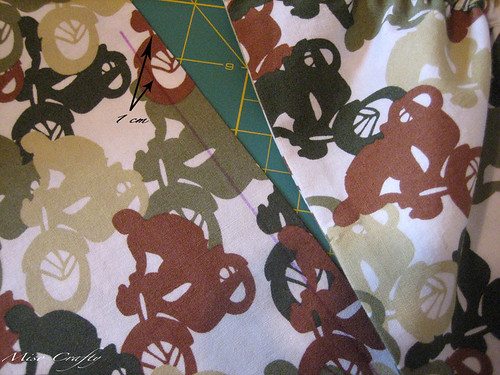
13. Place the carrier on a table so that the wrong side is facing up and the "top" of the carrier is nice and smooth.
Either feel the sandwiched seam allowance to use as a guide, or use a fabric marker and mark a line 1cm (1/2") from the edge like this along the "v" neck part of the carrier:
14. Pin the triangle to the carrier with wrong side facing, using the line you just made as your placement guide. To make life a little easier: move all the gathers in the triangle piece to the middle to make pinning and sewing onto the carrier easier!
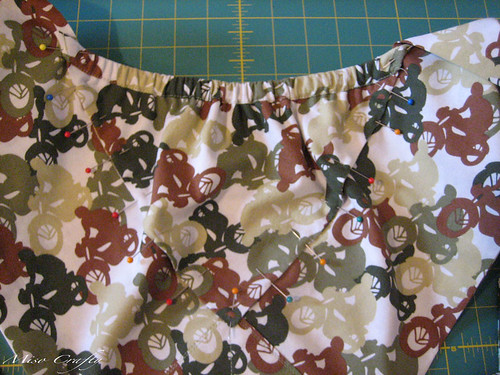
15. Ok, so I didn't mention what to do with the weird "wings" made when you formed the elastic casing in the triangle piece, don't pin down that part yet, leave that part free.

For this part you have 2 options: you can either leave it and just sew over it, or (and this is the method that I use, cause if you know me well you'd know that I totally hate unfinished seams and messy finishes!) you can fold the "wing" under...
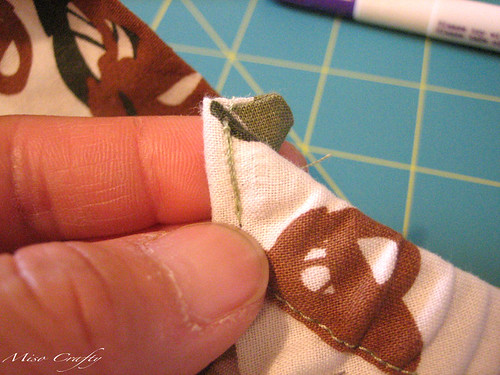
...and then snip off the excess tip. When you sew the piece onto the carrier the cut part will be enclosed in the seam, so no fraying or messy business will happen.

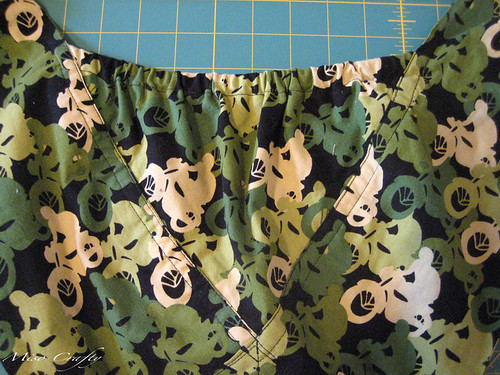
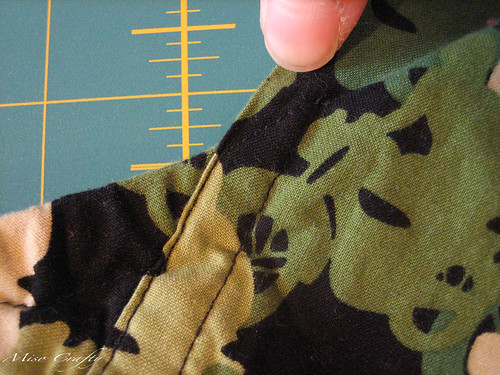
16. And the last step: sew the edge of the triangle piece to the carrier! You can either just edgestitch along the edge of the carrier, catching the support triangle piece along the way, or you can sew along both the edge of the carrier and the edge of the triangle like this:
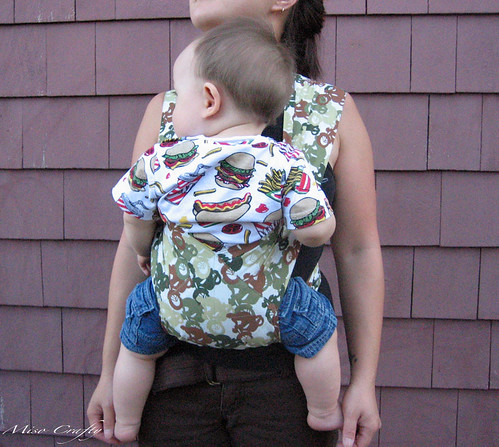
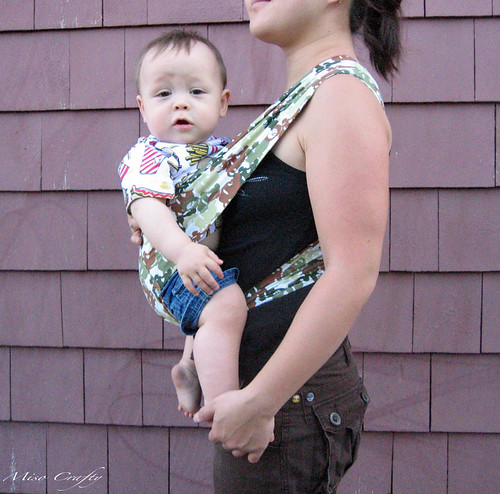
 I know the above and the following photos show a carrier in a different colorway, but I decided to keep the carrier in the toddler version since my son no longer needs the extra support. But this is the carrier that I made and have used when he did need it.
Here's a closer look at how I had sewn the tips of the triangle to the carrier to make it look cleaner:
 Voilà!
 You are done!
Now enjoy wearing your little one!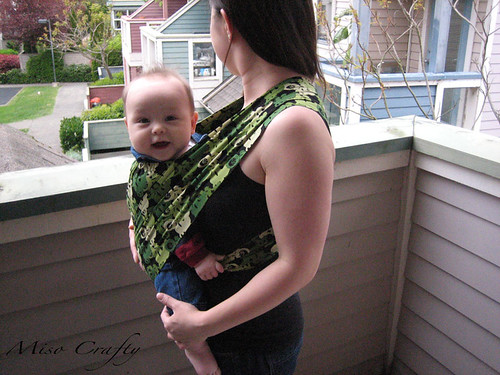
 I hope you guys enjoyed the tutorial! If you need any help, feel free to leave a comment or email me!
That is a great tutorial. I will have to save this for when someone I know has a baby.
ReplyDeleteWow! You are so patient to take pictures of all those instructions! Bravo! xo
ReplyDeleteThanks for the tutorial. i will try it soon =)
ReplyDeleteFan-flippin'-tastic! My little one has outgrown her sling, and we're ready for something new...I'll let you know how mine turns out!
ReplyDeleteChelsea:
ReplyDeleteOops! I'm so sorry, I completely missed the email that said you left a comment!
I hope it's not too late, but yes, it can work equally well for different sized people. To adjust the carrier, all you need to do is make the length of the strips either longer (for taller or broader people) or shorter (for those that are vertically challenged!). I know a few people now that have made/used the carrier ranging from very petite to a beefy 6'2" and they all had no issues with wearing the carrier.
I hope that helps you out!
Wendy:
Please do let me know how yours turn out!! My cousin had made hers after her wee one had outgrown the sling as well! My son never liked the sling so I really needed other ways to carry/hold him while still being able to use my hands!
Great tutorial! Can you use this carrier for storing your munchkin on your back?
ReplyDeleteThank you so much <3
ReplyDelete