
 I had mentioned in a post on my Facebook page (it's actually one of the responses to the survey about the '25 random things' that seems to be making its rounds on FB) about how I wanted to start an apron collection and how I plan on sewing a few in order to get that collection started. I do have that Emmeline apron that I had made last summer (which still needs the shoulder straps to be handsewn!). But one apron is not enough to call a collection!
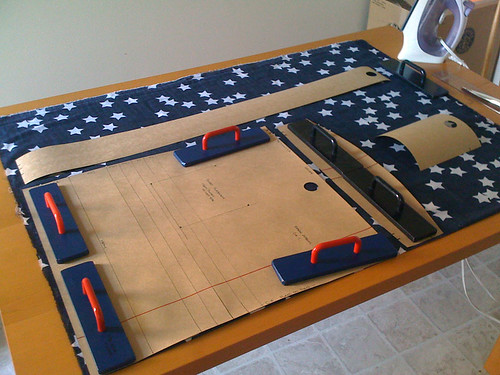
I found this thin cotton navy star fabric and decided that it must be an apron too. Just a simple, basic, half apron. Nothing too fancy as the fabric itself is quite loud. After looking at a few basic aprons online I drafted a basic apron pattern. Let's just hope that it works out!
I hope to get this cut out tonight and sewn before the weekend. I'm dying to do some sewing and this should be an easy enough project to get me started!
Hello!
ReplyDeleteJust came across your blog when i was looking up tips to crochet a Camillia Bedfellow toy...and I was wondering if you could let me know where you got your tips from to make one?
Thanks very much! (Very nice blog too!)
Best wishes Sam x
Hello Sam!
ReplyDeleteThanks for visiting my blog! I basically got my tips from just having a go and making a Bedfellow myself. What exactly do you need help on?
My basic tips:
- when working the last row of the worsted weight yarn (before using the chunky weight) make the row a little looser than norm, that way you can work in the thicker yarn and switch hooks easier.
- after crocheting the face, I satin stitched the eyes/nose/mouth before continuing on with the rest of the head. I found trying to do that after it was all worked up and stuffed was a little frustrating - especially if you're not that great at hand stitching in the first place. This just makes it easier.
- after working each limb, ears, and head, I fastened off leaving a length of yarn long enough to use to sew that part onto the body. Not sure if this is what Camilla Engman did or not, but I think it just makes the Bedfellow look more clean in the finishing.
- I didn't stuff the limbs as I crocheted them. I did the stuffing after I finished crocheting a part. I didn't like how the stuffing would either pop out while you were crocheting, and how sometimes the polyfil would get into the stitch - making the overall appearance look messy and fuzzy...but not the good fuzzy.
- I didn't stuff the ears for the bunny. My yarn was thick enough that I didn't need to.
- I crocheted all the contrasting "ends" of the arms and legs all at once since they are all the same anyways. I made crocheting the Bedfellow faster cause then you don't have to keep switching hooks.
I hope this helps! If you need any help, leave me a message!
Oh! And PS: Do you know what the pattern means when it says "work sl sts in back loops of sts throughout"? That's what threw me off the first attempt at this pattern.